Saturday, February 27, 2010

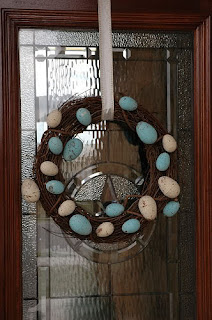
DIY Spring Nest Wreath

Ever since I took down the lackluster little red heart shaped wreath after Valentine's Day, my front entrance has felt a little BORING. Not to mention I put away the grapevine reindeer, and it's pretty much time to send those potted mini trees into storage as well.  I have to admit that coming home to a cheerful little wreath upon my door makes me smile everytime. 

Unfortunately, the Easter wreath my mother in law got me a few years back had gotten damaged in our first move, and since I wasn't much of a wreath person back then, I chucked it without bothering to try and fix it!  Regretting that now...

So I went perusing blogland for some inspiration, and found two that I am absolutely in love with and totally want to create my own versions of!


This first one, was exactly what I was envisioning, but 100 times better!!  I knew I wanted to use a grapevine form again, and wanted something with birds/eggs/nests.  Living with Lindsay created this gorgeous version of someone else's wreath and I think it turned out lovely!!  Exactly what I want to do!

It reminds me a little of this Good Housekeeping wreath I saved a while back.  Love the pussywillows!!

Then, a surpise when I fell in love with this sunny wreath created by Amy over at Design-Aholic.   Even better that it's pretty inexpensive to make.  I've yet to decide on my flower choice, but this one will be bringing me into summer, I'm sure!  Plus, it really has me missing my old dark brown front door... sigh!

Anyhow, I've started my first of the wreath projects today, but I'm not finished, so stay tuned later this week for the reveal.  Thanks ladies for such great inspiration!

Thursday, February 25, 2010

Going back in time....

Or at least that's how I feel.  You see, I haven't had photos developed since I got my first digital camera.... and let's just say it's been a handful of years.... whoops!

(this photo circa Nov 2006)

Yet, since we lived in the last place, I've had a desire to get some neat frames up!  Including a gorgeous collage frame from  Umbra  we got as a housewarming present that would be prefect with some black and white beauties!

So I did some research as to the best photo prices, and looks like Costco has the best bang for our buck right now.  So I have the painstacking task of going through a few years of photos on my computer, picking our my absolute favorites, and all others that are worthy of a photo ambum/scrapbook page/frame and downloading them into appropriate albums.

I will say that I am always smart enough to sort them into folders on my desktop, and properly label them when I download them, so that saves time!  But I don't mind having something to do since Cory  has been slaving away all week working 14 plus hour days....

I guess in the meantime, I will keep myself company, dreaming about being back here again!

Enjoy!

Tuesday, February 23, 2010

Bamboo Lovelies

Okay, I have to admit I did a little stalking last week! Yeah, during my regular Kijiji  browsing, I came across a pair of black lacquered bamboo tables/stools.  The price was reasonable, but I talked myself out of them, as we really don't need them.  Cory would be so mad if I bought them, I thought....

Yet, I checked their listing daily....

Imagine my surprise and delight to see them further reduced on Saturday evening before bed.  I quickly sent the owner an email asking their dimensions.  You know, I had no intentions of buying, but I just wanted to know, if the potential owner would be easily able to find cushions for the top.

They were a nice size, perfect height, wide enough to sit on, or accomodate a tray.  Oh good, the person who bought them would be lucky....

Later than afternoon I called and asked if they were still available!  I drove all the way to the other side of the city to pick them up.  They are chipped in a few spots, which is fine cause I plan on re-painting.

There is a tiny piece that is broken, that I am sure I can fix no problem.  Although, I will admit I almost walked away.  But I've loved bamboo for a while...plus I asked for a lower price.

For now, they are in the back of my car.  It'll be a while before they are ready for their AFTER photos.  I plan on painting them when the weather is warmer, and I want to find some cushions, if not make some.  I promise to post the photos when they are finished

A Little Softness Underfoot

There's been an unexpected new addition to our living room this week!

Cory works (very) part-time at Rona, and this past weekend, a friend from highschool happened to be there, searching for an area rug for their new house.  He spotted Cory and asked if he could get him a discount on the thing, and being the nice guy that he is, Cory used his employee discount to help a buddy out.  He ended up getting the thing for a great price and the guy came to pick up the rug last night.

Unfortunately, tonight he got a call from said guy who was not digging the rug in his space.  He actually said it was attracting lint and wanted to return the thing.  So of course Cory said no problem and the guy dropped it off. Earlier in the evening, I had mentioned (jokingly) that I'd look at the rug and see if I liked it, just to get Cory to stop whining about having to take the darn thing back.

When I came down from my nap 3 hours later ( sue me, I wasn't feeling great...), I took one look at the rolled up rug and immediately veto'd it.  Yes it was cream and shaggy, which was what I envisioned for the space even before it was finished being built, but there were long shimmery pieces of wool, and I thought it looked kinda cheap, so I didn't even bother with it.

Another hour later, again sick of hearing his complaints about having to lug the big thing back, I decided to at least unroll the rug and give it a chance.  Well, wouldn't you know, turns out I like it!!
Now I know that "design people" would say the rug is too small for the space.  I know the rule of thumb for rugs is that the front legs of all seating should be on the rug.  But to actually see the space, you would know it's a lot wider than it looks in photos.  Plus, I was a little hesitant to cover up the gorgeous floors!  I actually like the little dark wood border around the rug.

Although, yes, I can see it's a little off-centre right now...but the coffee table is huge and heavy and Cory's in bed and I can't grab him to help me move it....

I think it adds a little something to the room.. a nice texture that was missing before. 
Oh, and did I mention it is the softest rug ever.  Like amazingly soft on bare feet.
Plus, those shimmery threads I didn't like at first glance, add a sparkle to the whole deal, and really make it look pretty luxe.
Am I completely nuts?  Does it look ridiculous?  (excuse the poor midnight photo quality that makes all the colors look gross!)

Let me know what you think!!  I'd love to hear it and get another opinion, before someone spills on it, and we can't return it!

Thursday, February 18, 2010

What I'm Working On: A Sneak Peek


This is what I am working on now.... I wanted to share the BEFORE photos, but they are on the other computer... so I will share them when I do the big reveal.

I've had this piece since I was a teen.  I stole it from my parent's basement, and I think they were storing for a friend who never came back for his belongings...It is by far, the most handmade piece of furniture I have ever owned.  In fact, if you look carefully at the picture above, you'll see that the two pieces of wood forming the bottom, don't even match up.... yeah....anyhow, I'm not about to re-invent the wheel here, the thing is beyond STURDY, I am just looking to add a new, less ripped fabric.

Speaking of fabric, this is the one that I am using:
This picture doesn't even do it justice.  It's a gorgeous, very light silvery green blue (it looks a lot more steely, grey blue here).  The geometric pattern in the fabric adds a fun little texture and pattern.
Here's a pic to give you a better view of what it will look like when it's finished.  I haven't measured this yet, but I am pretty sure it will end up at the front door. The ottoman there right now, is a little too small in scale, and could be better used next to the couch!

It's already on wheels, but I might replace them with newer ones that won't scratch the dark wood floors!

If anyone has done a piece like this, I'd love tips on how to finish the base.  I am thinking I will need to sew all 4 panels of fabric together to form a loop.  Staple it to the bottom.  Tuck the foam in on each side.  Wrap the edges up, and staple into place....

Thoughts?

Tuesday, February 16, 2010

Playing around.. simple vignettes

Hope you all had  a lovely weekend.  Yesterday was a holiday here in Alberta, so I spent it having lunch an catching up with a girlfriend I hadn't seen in months.  I did not get a chance to work on some upholstery, as I had planned, but I am motivated to get it done this week (if I can track down all the supplies...)

Tonight, I am suffering from some neck pain and an overall tiredness (get'ting back in the gym regularly will do that to you...), so I decided not to tackle anything huge.  However, I did switch out the Valentine's stuff off the mantel, and bring it back to a more "everyday" look.  Which actually is perfect, since it's still wintery, and our everyday look is cream, turquoisey blues, dark dark browns and silver for accents, which really fits with the cool, wintery tone outside!

Anyhow, it was late and I can not for the life of me manage to take good pictures of the mantel in daylight, let alone at night, so here are some snipets (I've tweaked it a bit since), but I will share some updated shots on the weekend when I can get a nice daytime photo!
These are some of my favorite mantel pieces.  I love all of it, and best part - it was super cheap.
Turquoise SALONG vase - around $9.99
SKIMMER mercury glass candle sticks - $12.99 and $14.99
all from Ikea

The peacock feather was free, tucked in a plant pot from my boss' wife.  The candles were probably Ikea as well...

The "C" was a Winners  find in the clearance section for $7.99.
The planetaryéglobe thinger was a HomeSense  score, also on Clearance.
(I have since added a tall SKIMMER candlestick with glass votive atop, behind these for some added height.

** I ABSOLUTELY HATE THE TV over the fireplace.  This has plagued me ever since we moved in.  HATE IT!!! 
Unfortunately, as this is our main tv watching room ( for now...), without odd-layout and small space, this was really the best option. 

I would LOVE to be able to admonish the tv set from this space when we finish our basement next year... but I have a lot of convincing to do, in order to make it happen.  I would much rather having some gorgeous artwork or a pretty mirror up there...**

Also, here is a simple little vignette on one side of the fireplace, at the end of my sofa.  You can not tell from the poor photo, but at night time, the blues in the painting, and the lamp are soooo perfect.  The little heart frame was just a cute pop of color, plus the right size and scale for the spot!

Sunday, February 14, 2010

In Progress...

Please excuse any oddities today.  Since Cory  if off working today, and I am spending Valentine's Day with my two other loves (Greyson and Mischu... you know, the 4-legged variety!) I figured it might be a good day for me to figure out how to use the photo editing program I got for Christmas, and figure out how to make my blog all pretty.

Unfortunately, I am really no good at this thing... so it is taking a lot longer than I hoped!  Oh, and I am not using the same computer my old graphics were on, so in my playing around, I lost some stuff.... whoops!

Anyhow, please excuse the mess while I try to change things up.  Oh, and if anyone has any tips or wants to help out in re-designing my blog - I'd appreciate it!

Happy Valentine's Day!

Saturday, February 13, 2010

Pops of White - My display cabinet!


You may remember a few weeks back when I was mentioning that I was hoping to start a milk glass collection to showcase in our china cabinet/bar/display shelving in the dining area.  I was really unhappy with the current display of barware, since the clear glass was really just disappearing into the dark wood.  Plus, we really weren't using the area as a bar, like we thought we would!

Today, I changed it up!  No, I didn't get any milkglass yet (that's still to come!), but I did have a few white ceramic pieces I purchased for a spring mantel, that isn't quite ready for them yet...

(All pieces from Michael's ; all 40% off!!)

However, when I brought them home I loved them too much to just stick them into the armoire until the mantel was changed out.  So, I decided to just go for it, and switch out the display case.  (I'll spare you pictures, since I didn't take the time to take any, plus it was just not a good scene to begin with.

In addition to the three new pieces from today, I just used other random white pieces I already had.  I have far less nice pieces that I had wished.. but I made do.   It is by NO MEANS finished, and I will improve, and add pieces as I acquire them, but it is 100 times better than what was there before, especially since you can actually SEE the pieces now.  Take a look:
We had a bunch of different options for this space, and opted out of wine racks or glass racks, since we're not wine people.  In our heads these pigeon holes made the most sense, since we could use them for whatever... unfortunately, we didn't have the dimensions, and they turned out very narrow that not even a bottle of wine would fit!  For now, they hold single plates, and winter placemats.

I know... not great but better than before!
I have since changed the bird for a larger, lower bird to add some contrast.
These serving bowls are my favorites, a gift years ago, that came from Costco. The wicker balls (in neutral) were a Dollarama  find today.  I thought they added a little textural interest.


Here's the other side:

Seeing this photo now, these look too similar, so I will be moving things around later tonight.
Probably with this shelf that is very bland.

It was a quick afternoon project, and I am eager to get some new things to fill in the spaces and make it a lot more interesting.  But I am happy with the improvement already.

Wednesday, February 10, 2010

An Apology and some House-related venting

No, I've not been away.  Just starting to get over being sick (again.. sheesh!).  Not sure if it was a bad cold, or if perhaps I have some allergies....  That, and besides training for work, amping up my fitness program, and some construction related stresses around here, I've done little home improvements, or shopping.  Infact, I don't believe I have touched the home computer once in the last week.

So sorry if you've missed me. In my usual fashion, I've started a bunch of little projects here and there, but unfortunately have nothing big, or any actual progress photos to share.  But I will, now that I am on the mend!

In the meantime, what I do have, are some photos of some issues going on around here, that are real sore spots for me. You see, we live in a brand-new area.  Infact, when we moved in this past July, other than the showhomes on the street, there were only 2 other families moving in at the same time as us. There were no other houses around!  Unfortunately, that picked up and they have been working on the properties around us.  The streets here are RIDICULOUS!!

Leaving in the morning and coming home from work are almost UNBEARABLE!  There is no where to park, cars everywhere.  Messes are consistently left on our property, and the construction noise sometimes carries late into the evening (especially on warm days...)

I get that this is part of the territory that comes with owning in a brand new neighbourhood, but is it completely silly of me to ask for some respect?  I mean take the following photos for instance:
What's that you ask?  Hmm.. here's a closer look.
Yup, it's one of our downspouts, damaged by the construction workers next door.  And no one bothered to tell me, they just locked it back in place, and went about their way....
Same thing with the one at the back of the house....


 Why are they walking around in my backyard, so close to the house you ask?   Well, if you look closely behind that chair there, it's an outlet (with a GFI plug!!) and I have the electricity bill to prove it! 
 Yup, it DOUBLED!!

If that didn't knock me on my ass, then this might: 

That's in my front yard, and as you can (sorta) see, the boards are sticking out, far past my front porch. 
I'm lucky I don't knock my head when I leave the house!

I did however get smoked in the shin with a big piece of metal, as seen below:

Wonder if my neighbour is having as many issues as me?  I should ask, since it seems they are visiting his power outlets too!!

Sigh.... well, hopefully my well-put letter and incessant phone calls will get me somewhere soon....

** just a note:  the issues we are having, are with a different builder than we had build OUR house...*

Thankfully, all the construction will be done soon, and there was no landscaping done this past summer to ruin!

Monday, February 1, 2010

Embarassing Predicament

This post is a little embarassing, for two reasons:

1. What I am about to show you, is esthetically, a disaster.  I looks disgusting, and I've been living with it in the manner for months now.

2. The cause of the disasterous site, is something I am incredibly ashamed of.  I am aware it is incredibly bad for the environment, yet I am embarassed to admit I don't know what the best alternative is.... which is where I need YOUR help.

Without further ado, I give you the sink in my laundry room.  Albeit, it's an ugly white plastic tub in the unfinished cave that is my basement.  But nonetheless, serves a great purpose.
What you are looking at, my friends is my sink after I washed a paintbrush in it!!!!  Yes, that lovely Antuque Sterling wallcolor that looks like such a lovely light blue in our house, is actually GREY!!!  The paint would NOT go away!!!

Tonight, while Cory watched District 9 (which I  had no desire to see, and re-affirmed this decision 30 seconds after he ordered it), I headed downstairs to finish my laundry.  As I walked past the sink, grimacing at the mess in my sink, I suddenly had an idea:  MR CLEAN MAGIC ERASERS!!!

Wonder if they'll work?  Can't hurt to try, I suppose...

So, I spent about 15 minutes SERIOUSLY scrubbing the sink.

Thankfully, all that hard work paid off, because here's what it looks like now:
Yes, there is a tiny bit of discoloration still left on the right corner at the back (the first place the splash-back hit..) but it's a huge improvement over what was there.  Plus, after much scrubbing, I'm feeling pretty secure that the hint of grey paint is not something that would do any damage to any washables I soak in the tub!

Okay, okay, so now to address the real issue:  Why am I cleaning paint brushes in the sink?  The only reason I have:  My mom always did it when we were younger, and I can't say I'm done much painting in the last 10 years.... so I really have no other idea on what else I should do??

Now, as we start to embark on some home decorating projects in the near future, I know we'll be doing a lot more painting, so I ask all you bloggers in the know:  How do you clean your painting supplies?  Where do you put the dirty water?

I'd love to be more environmentally concious and I would love your input!